Version 1.0 preview · 14 October 2026. Actual screenshots contain demonstration data. Training does not establish permit coverage or professional qualification.
Lesson 01
Start with the site
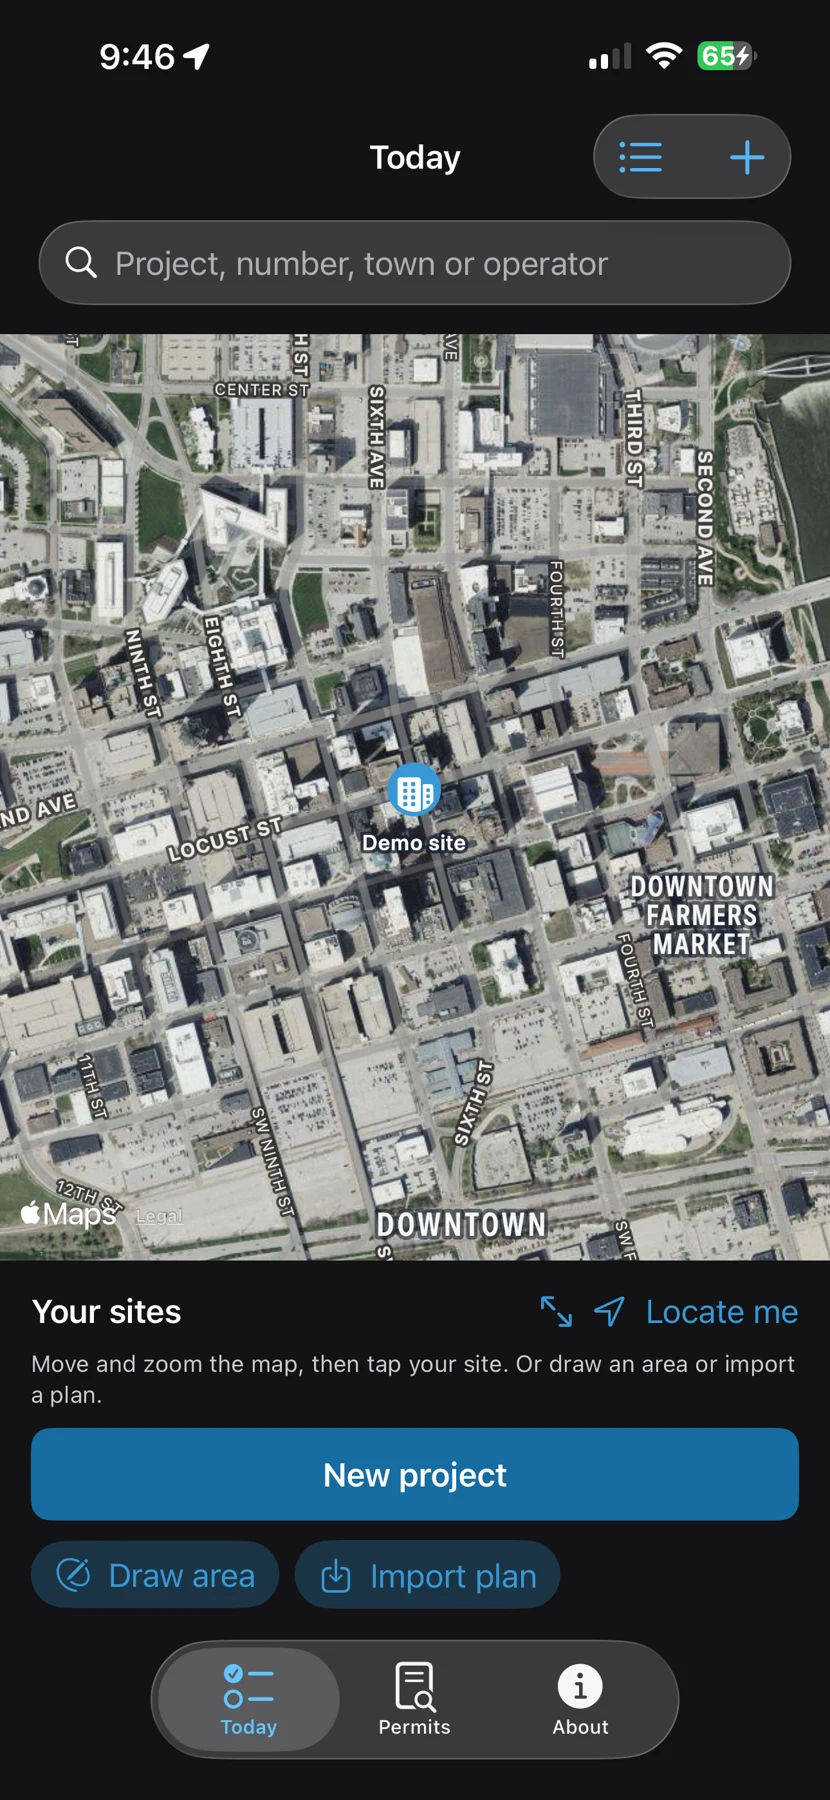
The map is the starting point. Existing projects remain available as pins and in the list.
Before the first visit
Gather the approved plans, applicable permit, project limits, operator details and inspector credentials. Confirm that your organization is eligible to use the app under PurposeBuilt terms.
Find the work
Move and zoom the map to the site. Use Locate me only when you want to provide device location. Show saved sites fits existing project pins back into view.
Choose a path
For a new site, select New project or Draw area. Import plan starts from an existing file. For a saved site, tap its pin and choose Start inspection, Resume inspection or Open project details.
Finish this step
You can identify the correct site and distinguish a new project from an existing inspection draft.
Start with the siteActual app screen with demonstration data. Tap to enlarge.
Training screenshots contain demonstration projects. Dates, conditions and findings are examples.
Lesson 02
Draw the disturbed area
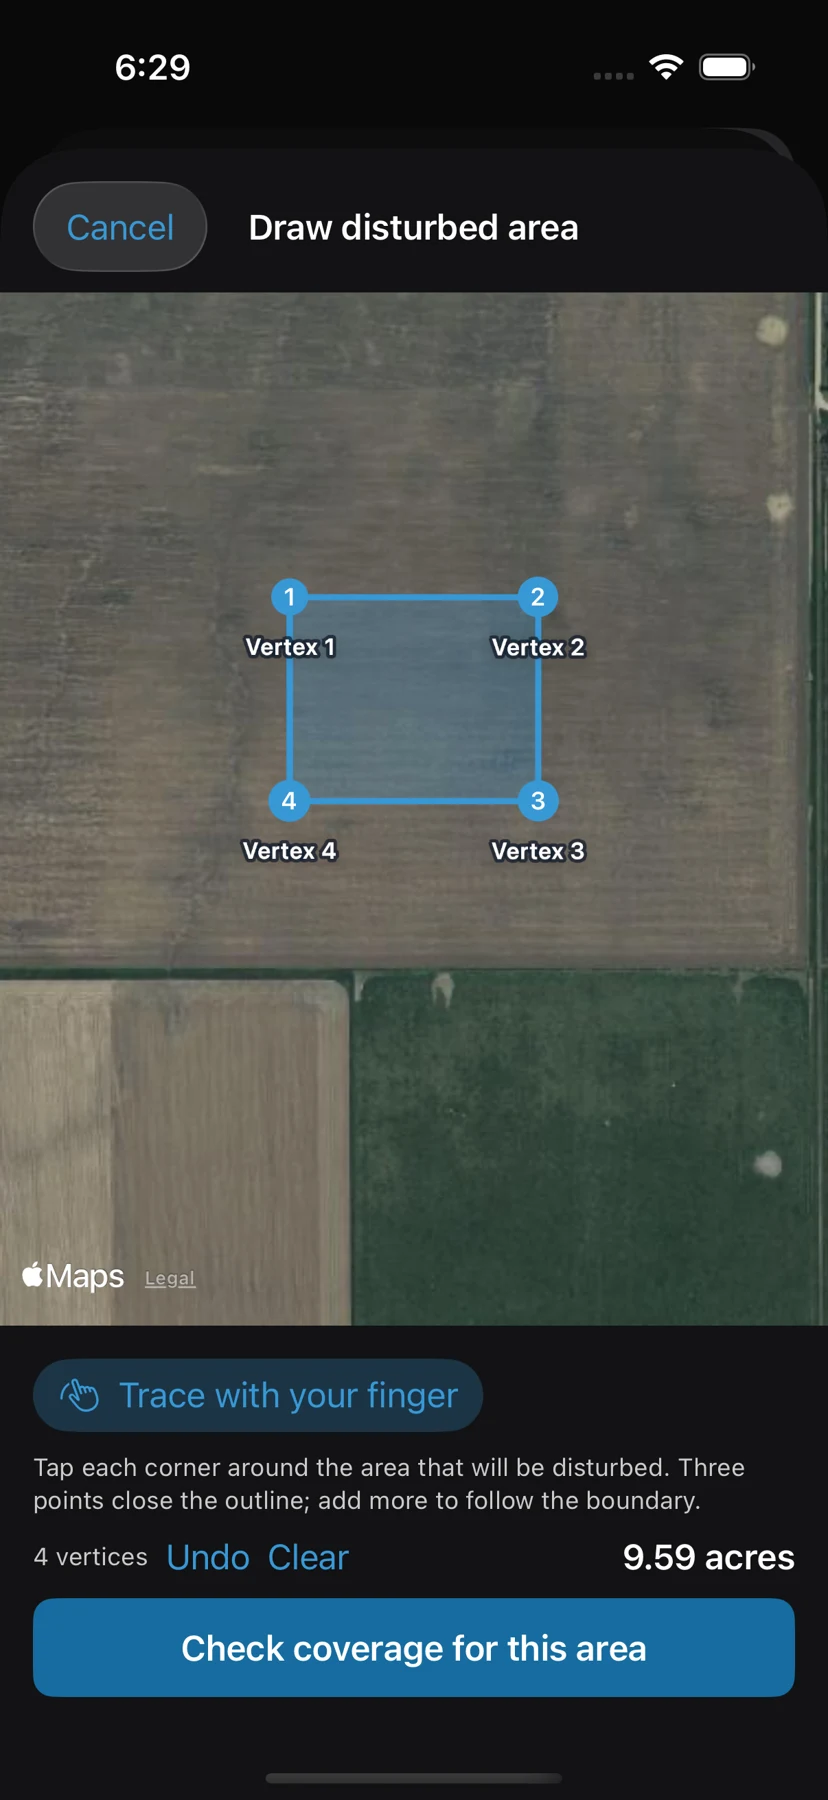
Tap numbered corners to define the limits of disturbance, then review the estimated acreage.
Place the corners
Open Draw area. Tap around the actual disturbed area in order. At least three distinct points are needed; the app closes the outline. Trace with your finger is an alternative.
Check the shape
Zoom in and compare the outline with the plan and field conditions. Use Undo for the last point or Clear to begin again. Crossed boundaries must be corrected.
Screen the area
Select Check coverage for this area. The outline and its estimated area become proposed project facts; the retained geometry supports later review.
Practice
Draw a small rectangle, undo one corner and replace it. Confirm that the outline represents disturbance rather than the whole parcel.
Draw the disturbed areaActual app screen with demonstration data. Tap to enlarge.
Map-drawn acreage is an estimate. Confirm limits, units and the actual disturbed area before relying on it.
Lesson 03
Review coverage before work
The coverage screen explains a proposed route and any missing facts. It does not issue a permit.
Confirm the facts
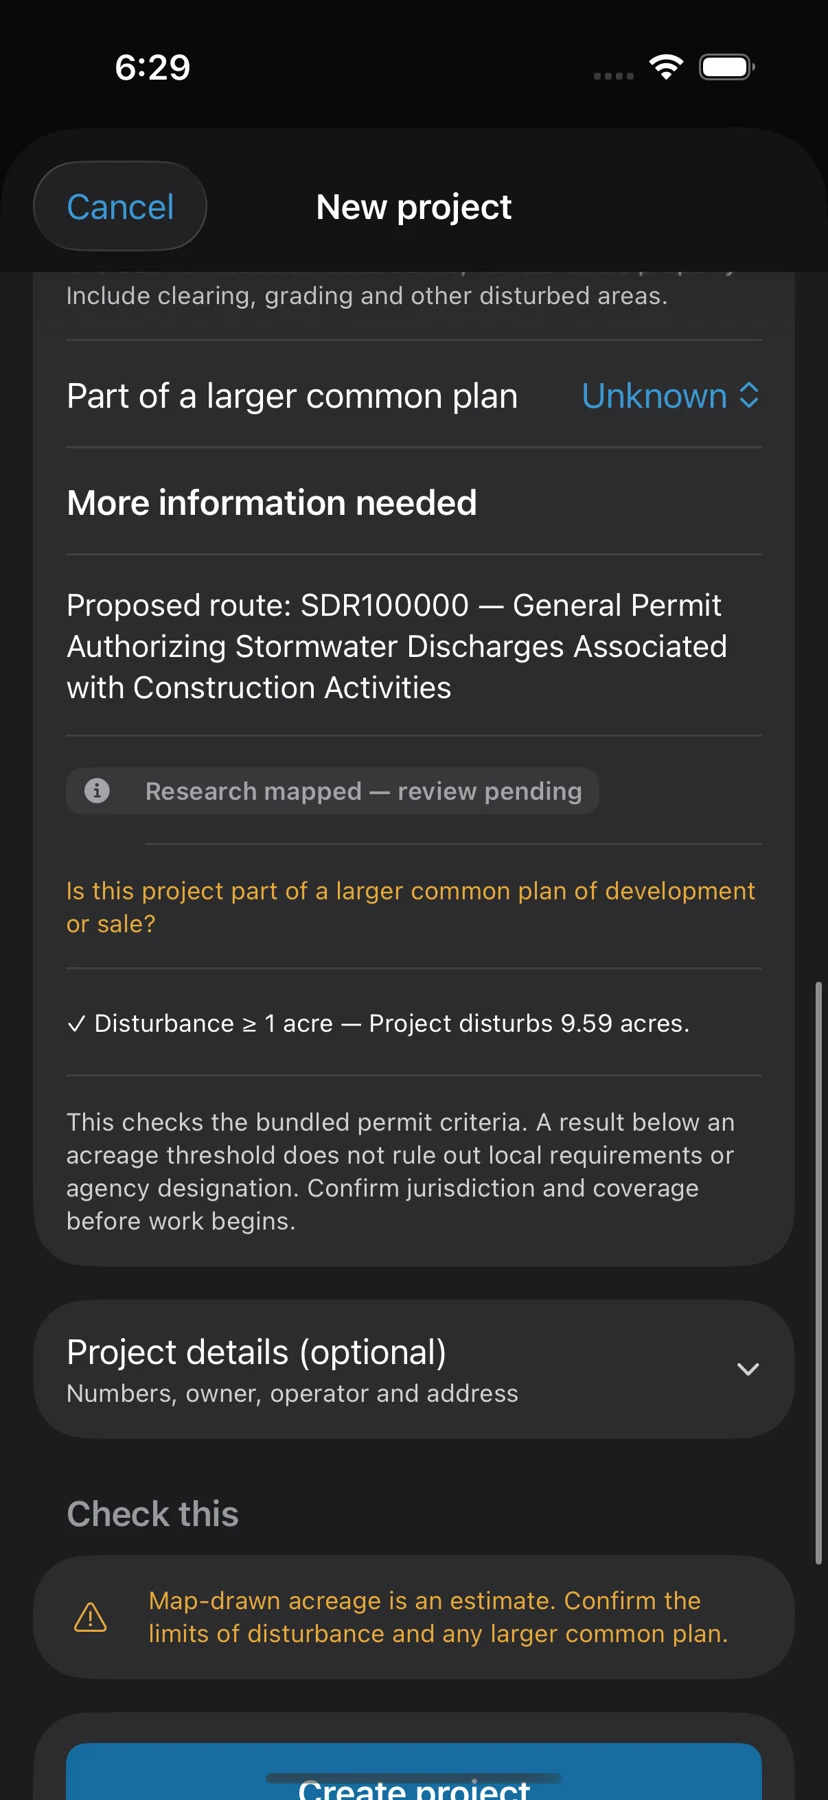
Check the proposed state and acreage. Answer whether the work is part of a larger common plan of development or sale. If Yes, enter the entire common-plan disturbed acreage, including fractional values where applicable.
Read the outcome
More information needed means required facts are unresolved. Matches a permit route means the entered facts match bundled criteria. No matching permit route from these facts means that this screen has not established a route.
Resolve the route
Read the questions and criterion explanations. Confirm jurisdiction, current agency requirements, your actual permit and approved project documents. Research-mapped packages are still pending qualified review.
Create the record
You can create a local project while some facts are unresolved. Complete permit and project setup before beginning an inspection that depends on the selected route.
Review coverage before workActual app screen with demonstration data. Tap to enlarge.
A small footprint alone is not an exemption. Common-plan acreage, local requirements and agency designation can affect coverage.
Lesson 04
Import plans and linework
Keep the source document and review every proposed fact before using it.
Boundary and geometry files
Use KML/KMZ, GeoJSON/JSON, coordinate CSV, Shapefile ZIP, vector GeoPackage or supported straight ASCII DXF. Include projection information and necessary companion files. Direct DWG import is not supported; export to a supported format.
Sheets and scanned material
PDF plans, supported images and text scans can provide on-device OCR proposals. A scanned page does not automatically become a correctly positioned map boundary. Review text and place or import geometry separately.
Verify coordinates
Confirm location, scale, units and the coordinate reference system. Known WGS84, NAD83, Web Mercator and UTM cases are supported; an unknown projection needs explicit supported EPSG information. Do not assume State Plane coordinates are recognized.
Select disturbance only
Review each imported area. Select the actual limits of disturbance. Holes can be retained; overlapping selected areas must be resolved so acreage is not counted twice.
Keep the original
In Documents, import plan sheets, site linework or project requirements. Original files are retained and hashed. Proposed requirements do not affect compliance until you approve them.
If an import looks misplaced or incomplete, stop and correct the source or draw the boundary. A successful file read is not proof of correct geometry.
Lesson 05
Prepare the project record
Project details bring setup, inspections, problems, documents and history together.
Complete setup
Open project details and Permit and project setup. Confirm the name, operator, jurisdiction, coverage facts, inspector and applicable permit package. Resolve the paperwork items flagged for review.
Attach controlling documents
Add the approved plan and project-specific requirements in Documents. Review OCR proposals against their cited page or section, then approve or reject each proposal.
Establish the control inventory
Check planned controls and their locations against the site. Give them recognizable names so later findings can be associated with the correct inlet, perimeter control or entrance.
Check the next visit
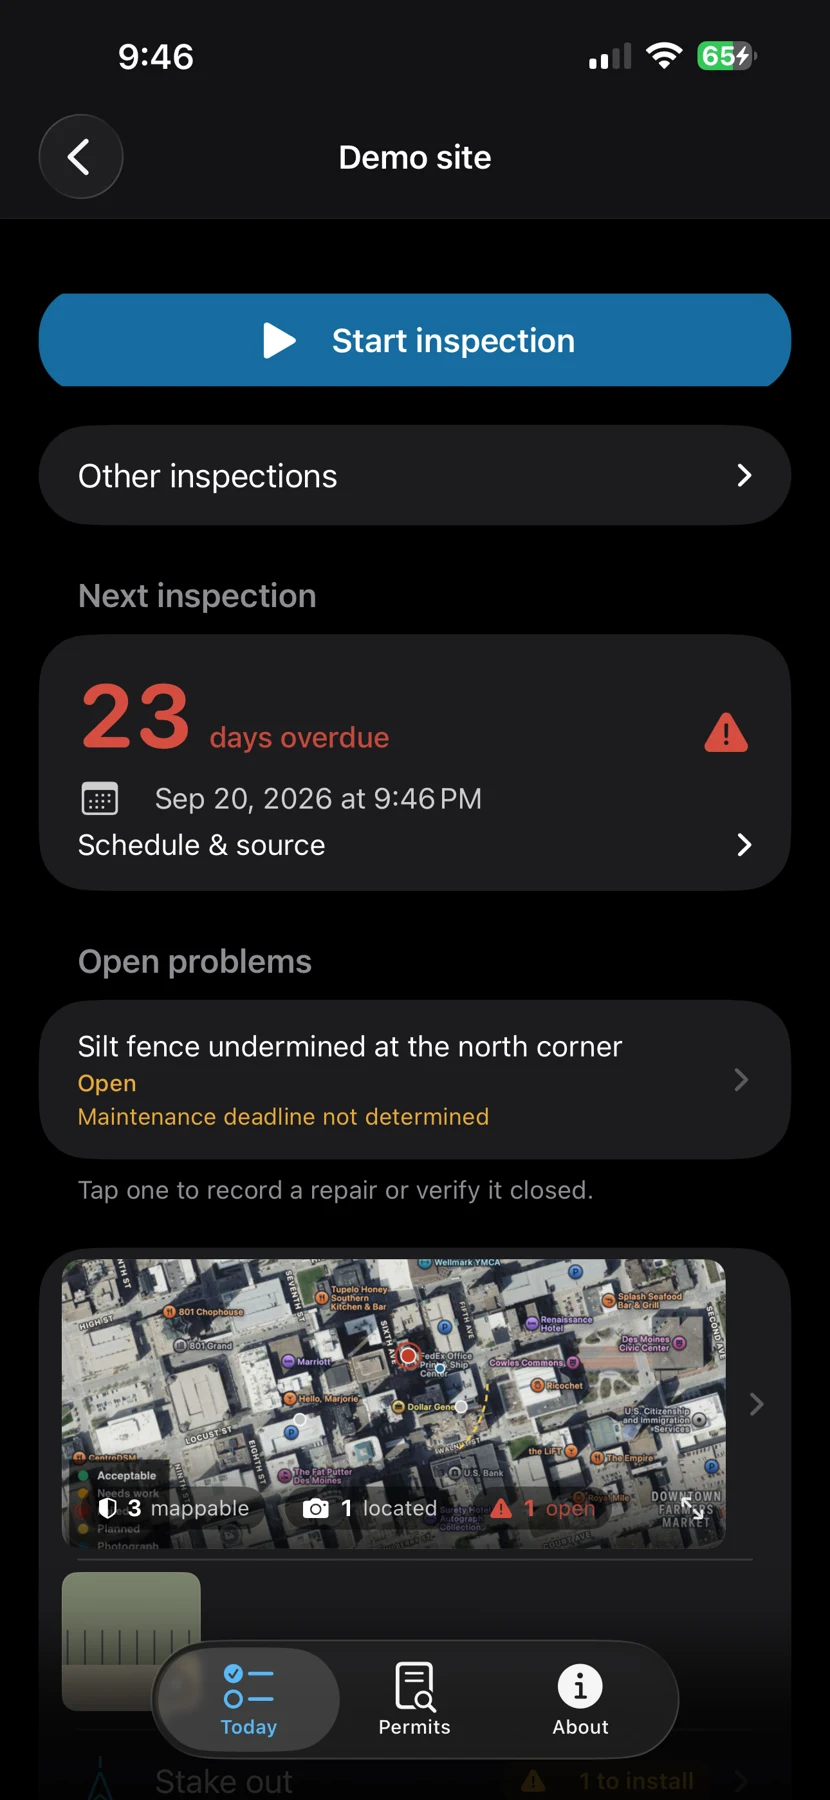
Review the next-inspection indicator and its basis. Missing cadence information must be resolved from the actual permit and project requirements. A reminder is a scheduling aid.
Finish this step
Another inspector can identify the site, governing documents, control inventory and unresolved setup questions.
Prepare the project recordActual app screen with demonstration data. Tap to enlarge.
The demonstration dashboard shows an overdue visit. An overdue badge is an example of a follow-up prompt, not a status for your project.
Lesson 06
Conduct the inspection
Start or resume the correct visit and record what you actually observe.
Open the visit
Tap the saved-site pin and Start inspection. Resume inspection reopens an existing draft. Choose a different inspection reason when needed, then confirm the visit date and inspector.
Walk the controls
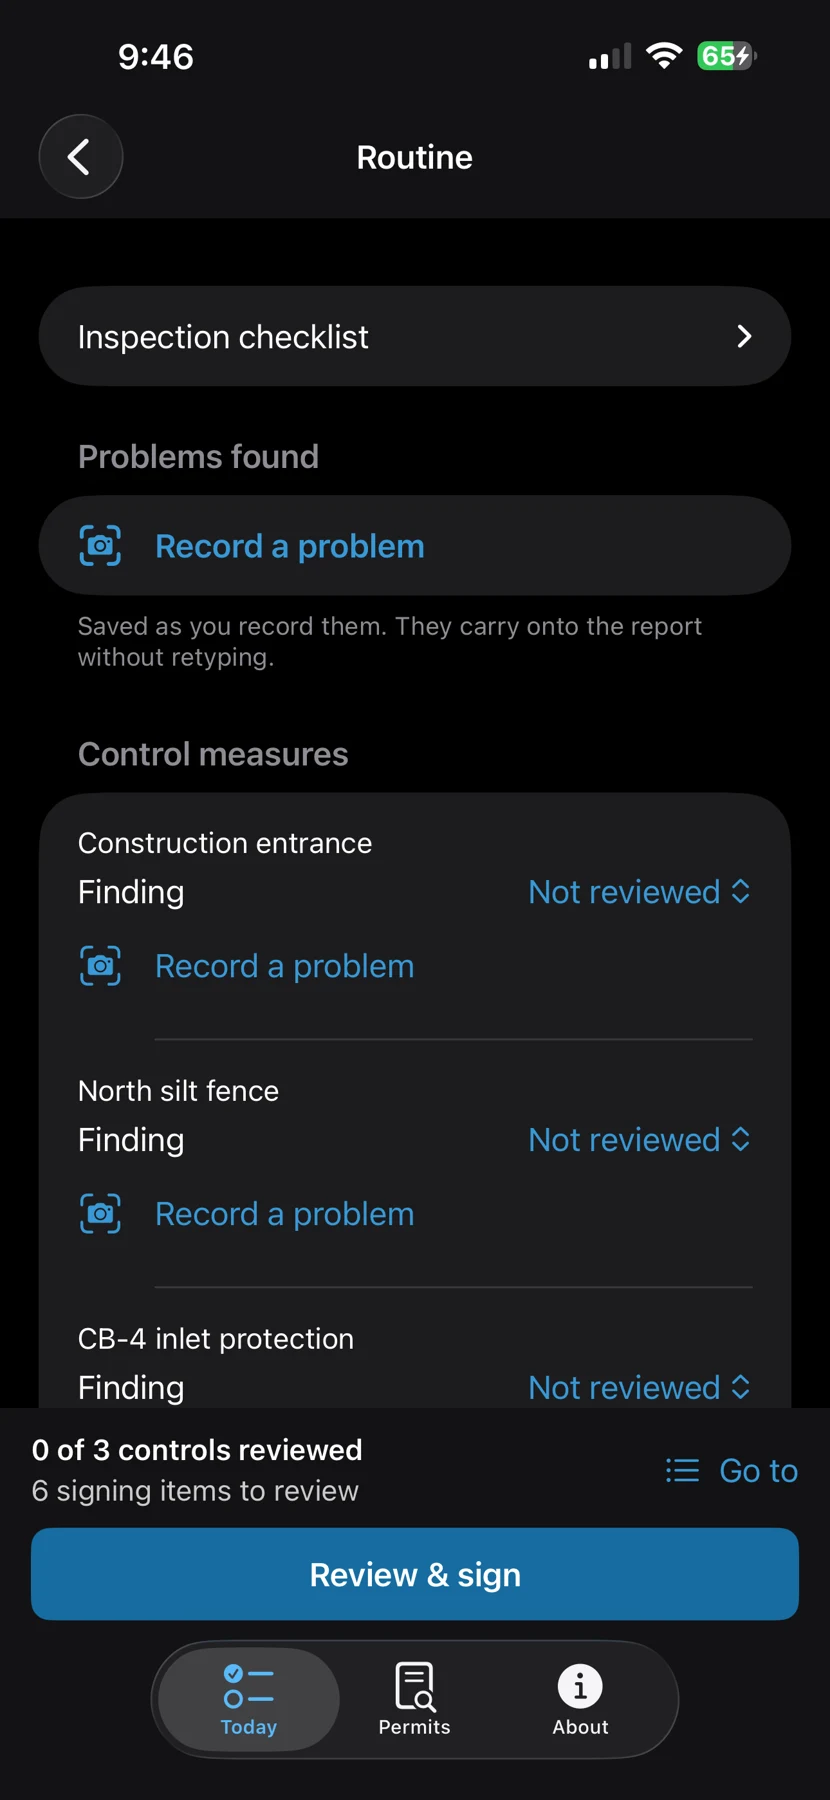
Review the inspection checklist and every relevant control. Record observed conditions, discharge information and monitoring details where required. Use Record a problem for a finding.
Keep facts separate
Distinguish observed conditions from assumptions or proposed actions. Record when and where you observed the condition, and select the correct control or manually corrected plan location.
Resume carefully
Draft work is saved locally. After an interruption, reopen the project and resume the visit. Inspect recovered entries and confirm unfinished captures before completing the report.
Conduct the inspectionActual app screen with demonstration data. Tap to enlarge.
An inspection draft is not a signed report. A saved but unconfirmed capture still needs your review.
Lesson 07
Capture useful evidence
A useful finding records the condition, location, timing and supporting evidence.
Describe the condition
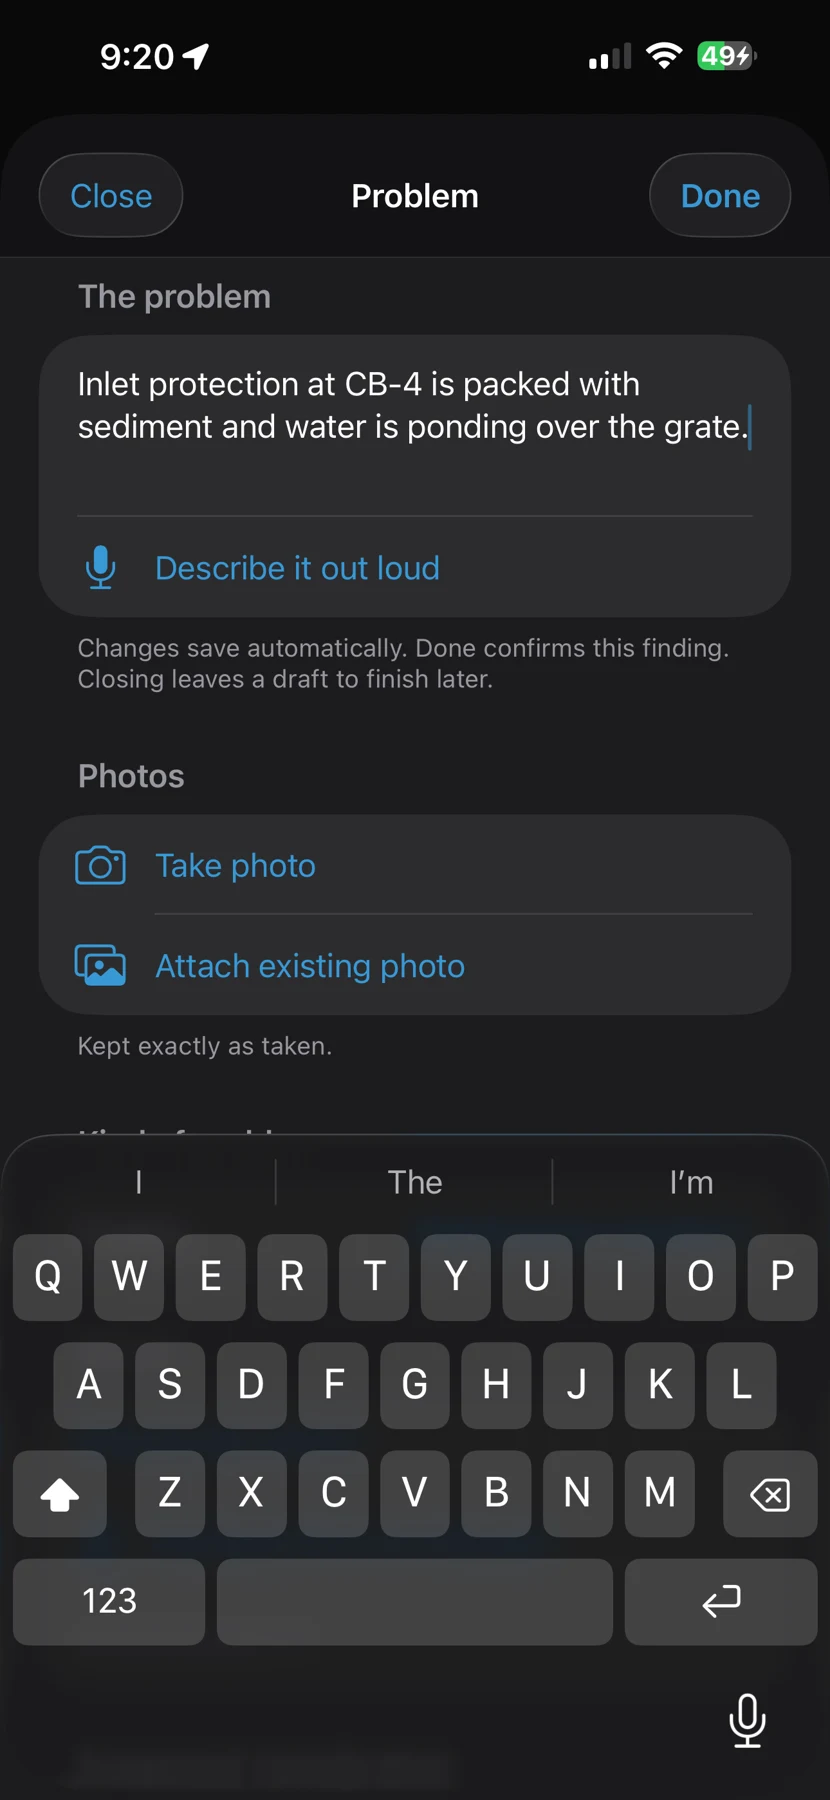
From Record a problem, type a factual note or use available on-device dictation. Describe what failed or changed, its extent and any observed discharge. Unsupported speech languages can be entered by typing.
Add photos
Photograph the condition and enough surrounding context to identify the control. Review the image and recorded time/location. If device location is wrong or absent, correct the plan pin and explain the location.
Review the proposal
Confirm the selected control, finding and captured facts. Photos can be evidence on their own, but a blank capture cannot be confirmed. Save only after the entry accurately represents the observation.
Preserve context
Retain original images and explain annotations. Later photo annotations retain earlier versions. A plan available in history does not by itself prove that it governed this finding.
Capture useful evidenceActual app screen with demonstration data. Tap to enlarge.
The sample capture uses typed observations. Your own finding should include the evidence needed to explain the actual condition.
Lesson 08
Record weather deliberately
Site observations remain yours to enter. Nearby station data is supporting information.
Use manual observations
Enter the actual site weather, rainfall or snow conditions and required time period. You can do this offline. Separate observed site conditions from readings supplied by a nearby station.
Request a station
Look up nearest station makes an explicit external lookup. Confirm the proposed station and fetched values before recording them. Check the station location, time window and relevance to the site.
Understand the setting
Automatic nearby weather in About is off by default. If enabled, nearby weather requests share coordinates with the National Weather Service and the surrounding station-search area with NOAA.
Handle missing data
A failed lookup is not zero rainfall. Record what is known, leave unknown data unresolved and use a defensible manual source when needed. Map imagery and fresh weather need connectivity.
Do not let a weather lookup replace the permit-required measurement, time window or site-specific monitoring procedure.
Lesson 09
Review, sign and export
Resolve missing items, review the record and sign only when the report is accurate.
Run preflight
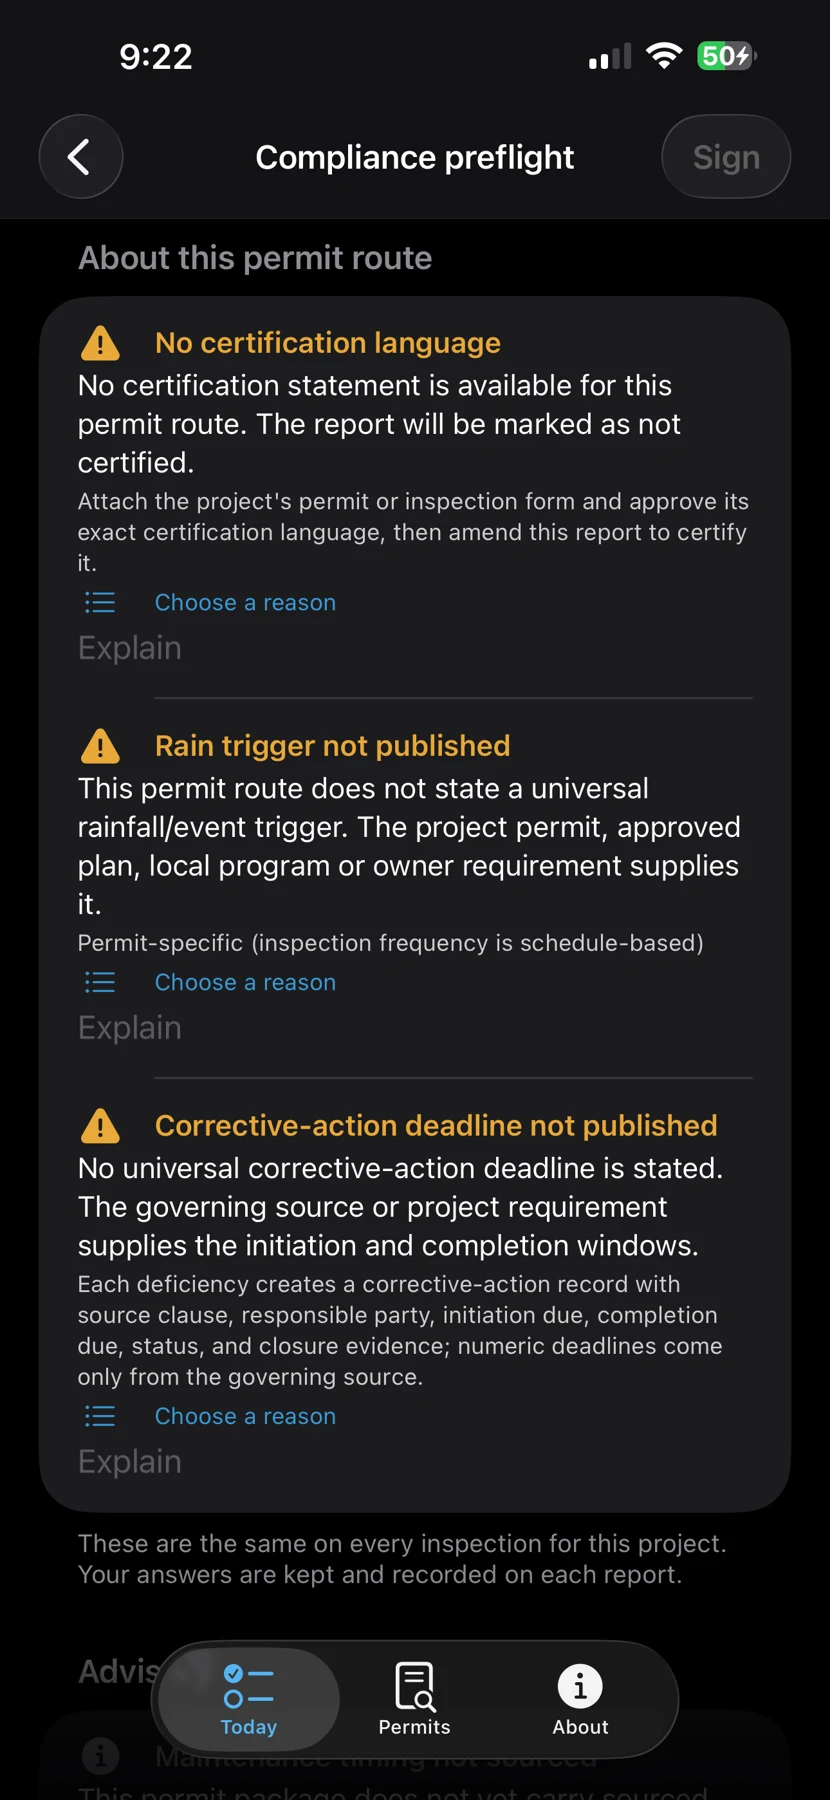
Select Review & sign. Follow the missing-item prompts back to the relevant fields. Check inspector identity, credentials, required observations, controls, weather and project-specific requirements.
Resolve exceptions
If a baseline certification rule is unavailable, obtain and record the project-specific requirement or exception with its basis. Do not treat a research-mapped package as independently certified.
Sign the completed visit
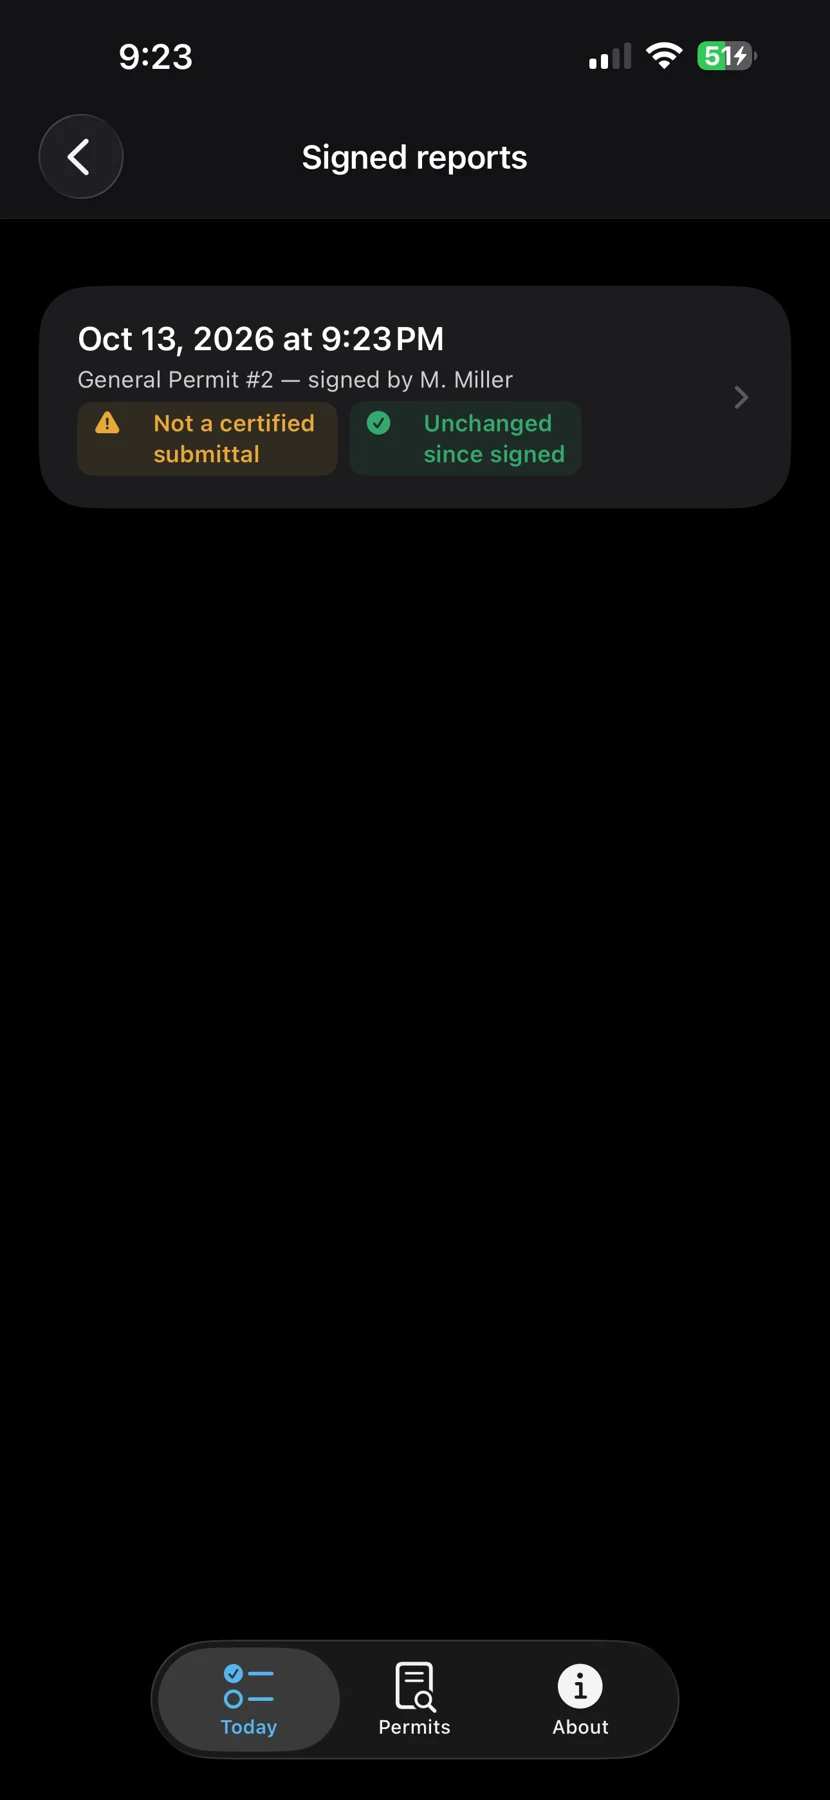
Review the final record before signing. Signing preserves an immutable hashed report. Corrections to a signed record need an amendment so the earlier signed version remains available.
Inspect the output
Open the report in Reports. Read the PDF before sharing it; check names, dates, locations, findings and attachments. Use integrity verification where available to check the preserved report.
Review, sign and exportActual app screen with demonstration data. Tap to enlarge.
A completed form, signature or integrity hash establishes a record of the workflow; it does not independently certify regulatory compliance.
Lesson 10
Repair, then verify
An issue remains a separate record after the inspection is signed.
Record the repair
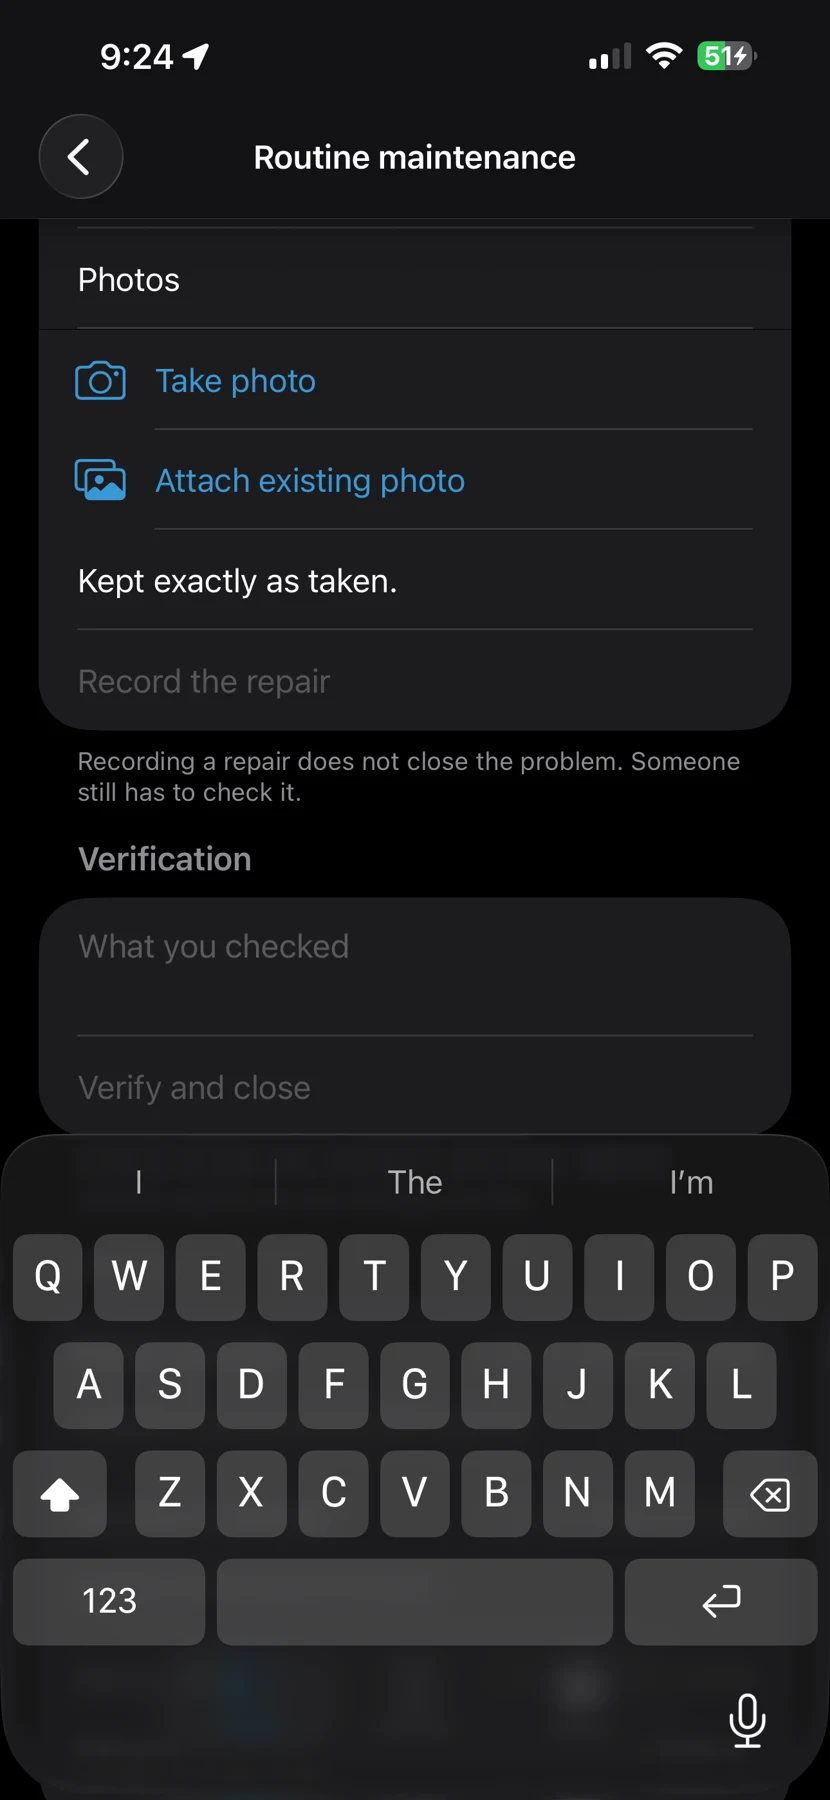
Open the issue and record what was repaired, who performed it, when it happened and the supporting photos or notes. Signing the inspection does not close an open issue.
Verify the outcome
Return to the issue and record verification against the observed condition and required corrective action. Repair and verification are distinct events.
Check deadlines
Use the project permit and requirements to establish applicable deadlines. If the app cannot determine a deadline, resolve it explicitly rather than assuming no deadline applies.
Review the lifecycle
Confirm that discovery, repair and verification appear in the issue record and project history. Keep the earlier inspection and subsequent corrections available for review.
Repair, then verifyActual app screen with demonstration data. Tap to enlarge.
Do not mark an issue verified solely because someone entered a repair note. Verification needs its own evidence and basis.
Lesson 11
Maintain the living record
Project history connects saved edits, documents, inspections and issue events over time.
Open the timeline
In project details, select Project history. Use category filters and search to find a plan, saved edit, inspection, signed record or corrective action.
Read the evidence
Open a history entry to inspect its available before/after facts, source document, original photo or related record. Compare revisions rather than relying on the latest dashboard alone.
Replace without erasing
Import an updated plan as a new document version and explain its effective use. Make corrections through saved edits or report amendments, preserving earlier evidence.
Know the boundary
History retains saved changes from the time the feature was enabled. It cannot reconstruct old edits that were overwritten before history existed. Available plan dates alone do not establish which plan governed a finding.
Practice
Update a sample project fact, attach a revised plan and record a repair. Find each event in history and explain the sequence to a reviewer.
A living record is useful when changes have dates, sources and explanations. Keep context with every material revision.
Lesson 12
Share and back up the project
The first release uses exports for sharing and backup.
Choose the deliverable
Use a report PDF for a reviewed inspection. Use the project export/archive when the handoff must include the broader record and original plans, photos and reports.
Make the export
Open Sharing and backup from project details. Save or share the export to your approved file location. Choose the intended recipient and check the contents before handing it over.
Verify a backup
Keep a separate copy outside the app. Confirm the exported file opens and contains the expected records. Practice restoring or importing a sample archive before depending on it for recovery.
Protect the device record
Export before deleting the app, replacing the phone or removing a project. A local draft and its attachments are not automatically a remote backup.
Know the release scope
Automatic team/cloud synchronization is not part of the App Store release. Development sync screens are not a production collaboration service.
Share and back up the projectActual app screen with demonstration data. Tap to enlarge.
Use your organization's approved storage and retention process. Check recipients before sharing project documents or photographs.
Lesson 13
Field checklist and troubleshooting
Use this page to close a practice visit before starting a real project.
Before work
Confirm eligibility and project authorization; current permit and approved plans; disturbance boundary and common-plan acreage; inspector credentials; required controls and monitoring; charged device and backup location.
Before leaving the site
Review every required control; save confirmed findings and photos; identify corrective actions and deadlines; check missing items; sign only a complete, accurate record; verify the exported PDF.
No map or misplaced geometry
Map imagery may require a connection or cached tiles. Confirm coordinates, projection and units for imports. Do not use an incorrectly positioned boundary; correct the source or draw a reviewed outline.
Cannot sign or missing weather
Follow preflight prompts. Resolve permit/setup questions and required fields. Enter defensible manual weather data if a station lookup fails; missing values are not zeros.
Need help
Visit purposebuilt.systems/stormcheck for the current manual or email matthew@purposebuilt.systems. Provide app version, device, steps and a redacted example. Optional AR is a field placement aid, not surveyed positioning.
Training is an orientation, not a professional qualification. Version 1.0 preview; 14 October 2026. Confirm current project and agency requirements.