From first capture
to a clear handoff.
Learn DRU in ten practical lessons. Capture points and lines, check the evidence, understand public GIS, and give the next person a record they can use.
Evidence that stays
with the record.
- 01Prepare the project and work area
- 02Capture a point, a line and photos
- 03Separate assets from reference layers
- 04Reopen the export with your reviewer
Prepare your device and training session
Start with the right permissions, units, and a practice record that will not be mistaken for production data.
- Install or update Digital ROW Utilities from its official App Store listing. Read the onboarding screens, then open Settings and note the version and display units you are using.
- Allow location while using the app for field capture. Enable Precise Location when the work requires it. Camera access is needed for photos, OCR and live AR; photo selection permissions depend on the workflow. Grant permissions when prompted for that feature.
- Charge the device, check storage and prepare any offline maps needed for the site. Start a practice project named DRU TRAINING - DO NOT SUBMIT. Use fictional identifiers and a safe training area.
Try it on your training project
Write down the installed version, unit preference, and the location permission state. Identify how you would restore a denied camera permission in iOS Settings.
A permission grant does not establish measurement accuracy. Network access is needed for fresh public GIS queries; a saved project does not mean every online layer is available offline.
Set the project, permit and work area
Make each capture traceable to the correct job and work area.
- Create or activate the practice project before collecting features. Review the project and permit shown in the capture header; do not rely on the last project used by another crew member.
- If your workflow requires a permit record, enter the applicant, owner, work description and dates in the permit setup. Record an actual authorization only when it has been issued; a draft application is a different record.
- In Select Work Area, tap at least three polygon vertices around the practice area. Use Undo or Restart to correct the boundary, then Finish Area. Inspect the saved outline at a useful map scale.
Try it on your training project
Draw a four-vertex practice work area and explain how you would detect a wrong project or an outline placed on the wrong street.
A work-area polygon records intended work. It does not establish property ownership, a legal ROW boundary, permit approval, or permission to excavate.
Capture a point with evidence
Save one recognizable asset with its observed location, identity and supporting photo.
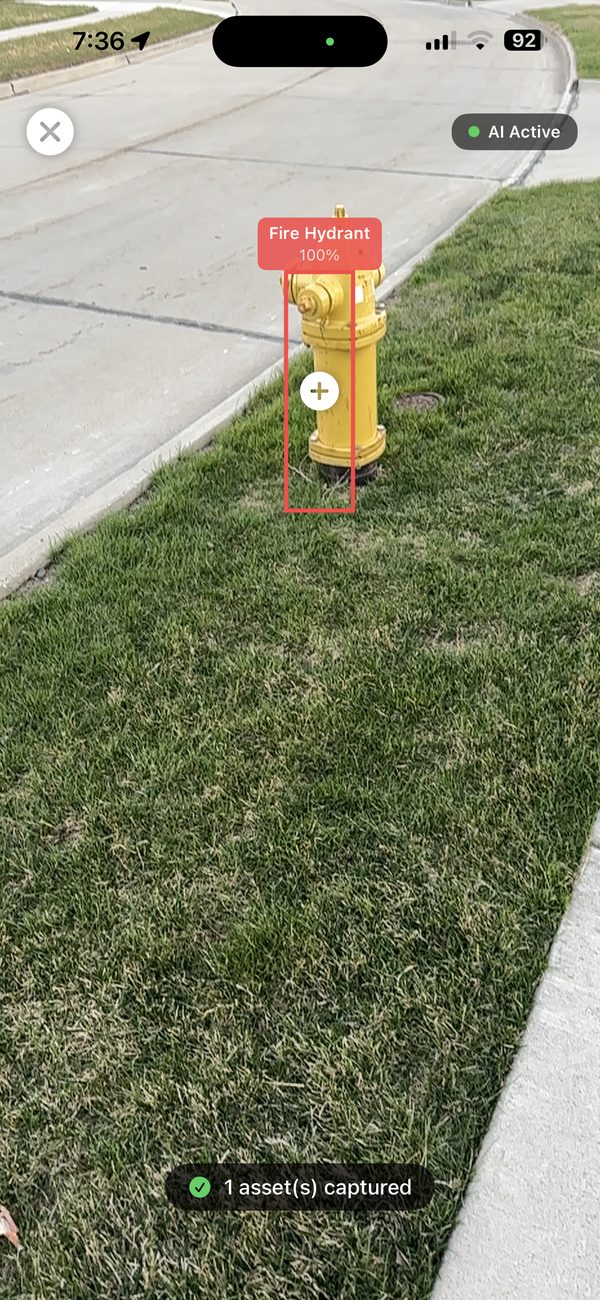
- Open Capture Utilities or the capture map. In the map workflow, use Add, then Point. In builds with the standalone capture screen, use point capture and wait for the GPS indication before recording.
- Set the utility domain and asset type. Enter the owner and a unique training asset ID such as TRAINING-VALVE-01. Review the capture method and the reported positional uncertainty. Explain whether the location came from GPS, a map tap or another input.
- Attach a context photo and a close-up showing the asset identity. Add a concise note about what was observed. Review required fields, save the feature, then reopen it from the map or feature list.
Try it on your training project
Create one fictional training point. Have a partner locate it in the saved project and explain its method, owner, photo and uncertainty.
Map-tapped or manually entered coordinates are different evidence from a measured field fix. Do not describe a dropped pin as a survey measurement. AI suggestions must be checked before saving.
Capture a line and document changes
Represent a run as an ordered series of vertices and keep evidence attached to the feature.
- Choose Line in the capture workflow. For map entry, add vertices along the practice alignment and use Finish before completing the attribute form. For walked GPS capture, configure the asset, use Begin Recording, and finish the recording before saving.
- Include vertices where direction or the represented alignment changes. Review the vertex order, length and geometry on the map. Enter owner, material and dimensions only when supported by the observation or source record.
- Attach photos at the start, end and important changes. Use notes to distinguish directly observed portions from record-based or inferred portions. Save, reopen and inspect the entire run rather than only its first vertex.
Try it on your training project
Save a three-vertex training line with a bend. Compare the displayed shape with your intended path and identify one place where another photo would improve the record.
A line joining two points is a representation, not proof of an unseen pipe route. Do not walk an unsafe or restricted alignment merely to complete a training exercise.
Review OCR, attributes and data quality
Separate observed facts, document readings and automated suggestions before review or certification.
- When Scan Material Cert is available, photograph a readable tag or certificate. Review the OCR result against the original image. Check decimal placement, diameter, wall thickness, material, manufacturer and unit labels before accepting values.
- Inspect the saved feature's required attributes and provenance. Keep unknown values unknown using the options available in the installed form. If a required field cannot be supported, resolve the evidence gap instead of entering an invented value to pass validation.
- Review quality-level assertions and their evidence with the responsible reviewer. Record the actual method and reported uncertainty. Use certification or sign-off only within your role and your project's review procedure.
Try it on your training project
Find and correct one deliberately mistyped training dimension. Explain why a complete form or a successful OCR result does not by itself establish a utility quality level.
App validation, ASCE-oriented fields, signatures and hashes do not independently establish compliance, survey accuracy, utility location or a professional credential.
Find and compare public utility sources
Choose a relevant source and understand what its geometry represents before using it as context.
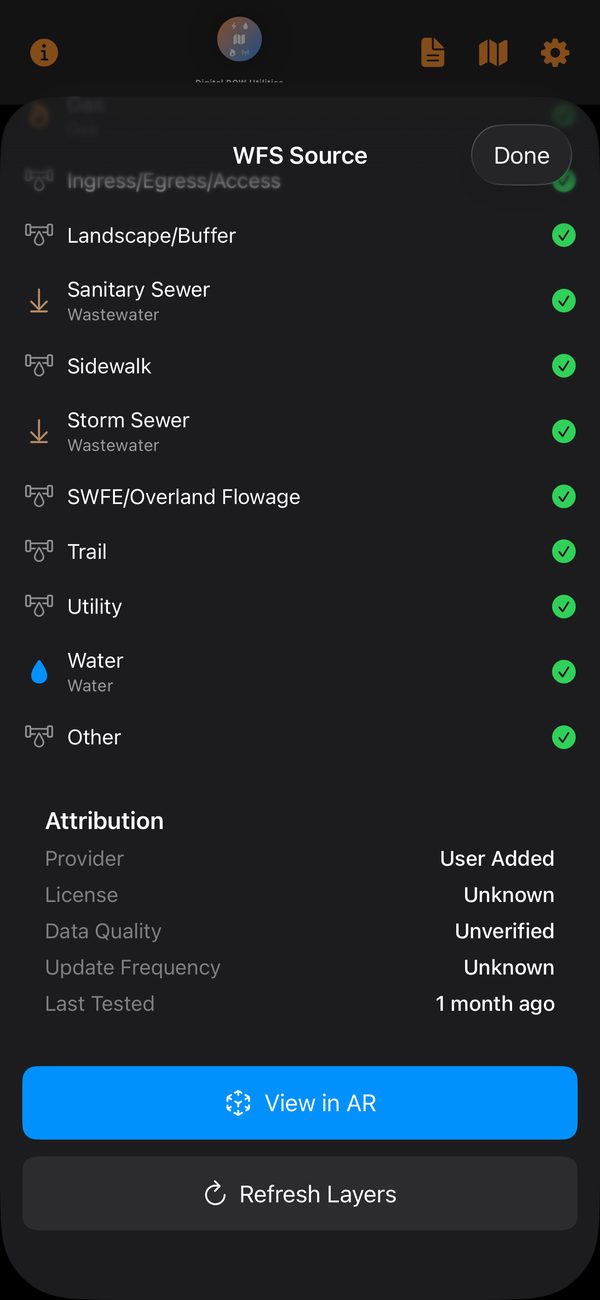
- Open WFS Registry. Search by city, county, publisher or utility. Allow location if you want nearby ranking. A Portal is a website to browse; a Service can return features to the app.
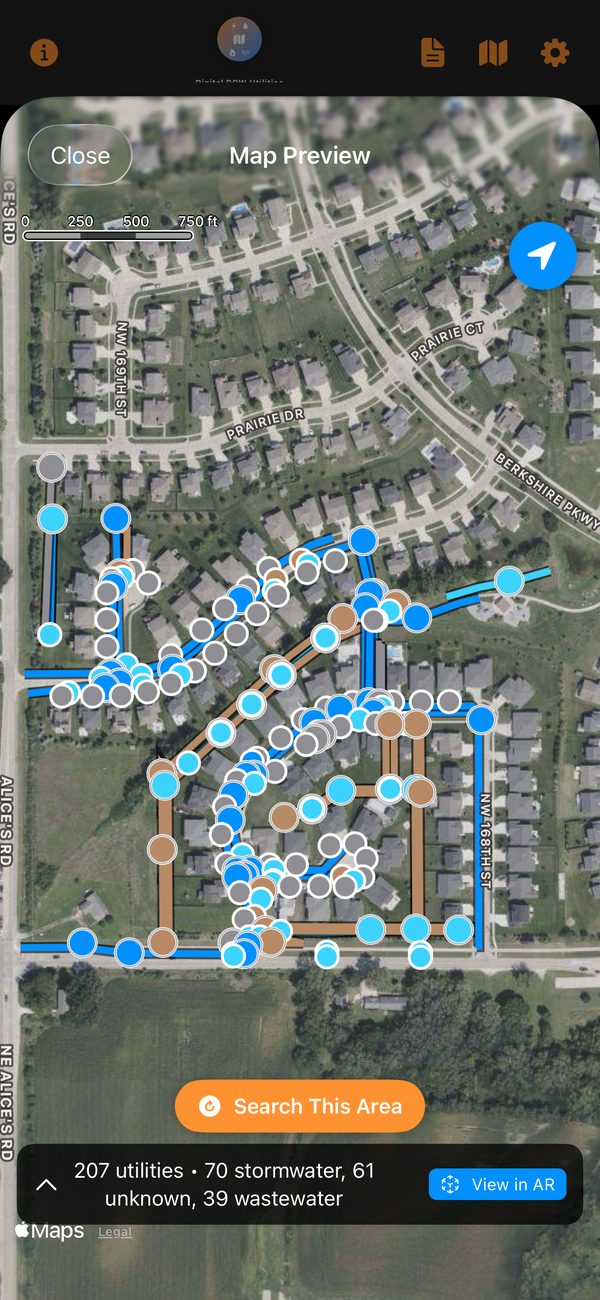
- Open a source and check its publisher, coverage, available layers and status. Choose only the layers relevant to the job, then View on Map. If no features appear, verify the map area and selected layers before assuming the service is empty.
- Compare public geometry with your captured features. Use Overlay other sources when appropriate, and retain source names in your review notes. Confirm currency, permitted reuse and positional limitations with the publisher.
Try it on your training project
Select one utility service and one portal. Explain their different behavior and identify the publisher and the geographic area of the service.
Public utility geometry is reference evidence. Source availability, apparent precision or an AR overlay is not an excavation locate. A service-area boundary tells you where a provider serves, not where a pipe is buried.
Use the national GIS Reference update
Use roads, wetlands, flood context, parcels, ROW/easements and soils as planning layers without confusing them with captured assets.
- In a build containing the October 2026 update, open WFS Registry and select Reference. Search for the source category or publisher. National sources include USFWS wetlands, Census TIGERweb roads and FEMA flood context; local and regional coverage varies.
- Read the reference label, source notes, coverage extent and tested date. Select a relevant layer and View on Map. Reference geometry does not offer the underground AR asset action. Parcel and ROW outlines remain approximate reference unless the publisher and project establish otherwise.
- For soils, use the regional queryable sources where available. The official national NRCS Soil Data Access entry opens a browser portal. It is not a national in-app soil overlay. Record which source informed a decision and which additional records or field checks are needed.
Try it on your training project
When the update is available, compare one utility asset source with a wetland or parcel reference source. On an older build, use the source links in this course and describe the same distinction without checking off an unavailable app feature.
The update added 278 new queryable services and one national soil portal after searches spanning all 50 states. That is discovery scope, not complete US coverage. Wetland mapping does not establish regulatory jurisdiction; roads do not establish ROW limits.
Use AR and LiDAR with the right limits
Treat visual overlays and local distance/depth observations according to their actual evidence and device support.
- Use a supported physical iPhone for live AR. Grant camera access, move slowly to establish tracking and inspect the tracking state. For utility-source AR, select physical asset layers and confirm the intended source and area before opening the overlay.
- If the build and device support LiDAR or trench capture, follow the mode's prompts and confirm the reference surface, target and units. Record what was actually measured. A local surface distance is not automatically depth to a buried utility.
- Pause capture if tracking is unavailable or the scene changes. Re-establish the view and repeat observations as required by the project. Compare the record with an independent field check before relying on a measurement for a consequential decision.
Try it on your training project
Explain what you would do after tracking is lost. If no supported device is available, discuss the screen and method with a trainer; do not mark physical AR validation complete.
Simulator checks test workflow behavior with synthetic coordinates. They do not validate real camera tracking, depth, field accuracy or the location of underground infrastructure.
Review, export and retain the session
Deliver a file another person can inspect and preserve the evidence needed to understand it.
- Review the active project's point and line on the map. Check owner, asset IDs, units, method, uncertainty, photos and unresolved notes. Use the editing tools appropriate to your build; review any bulk change before accepting it.
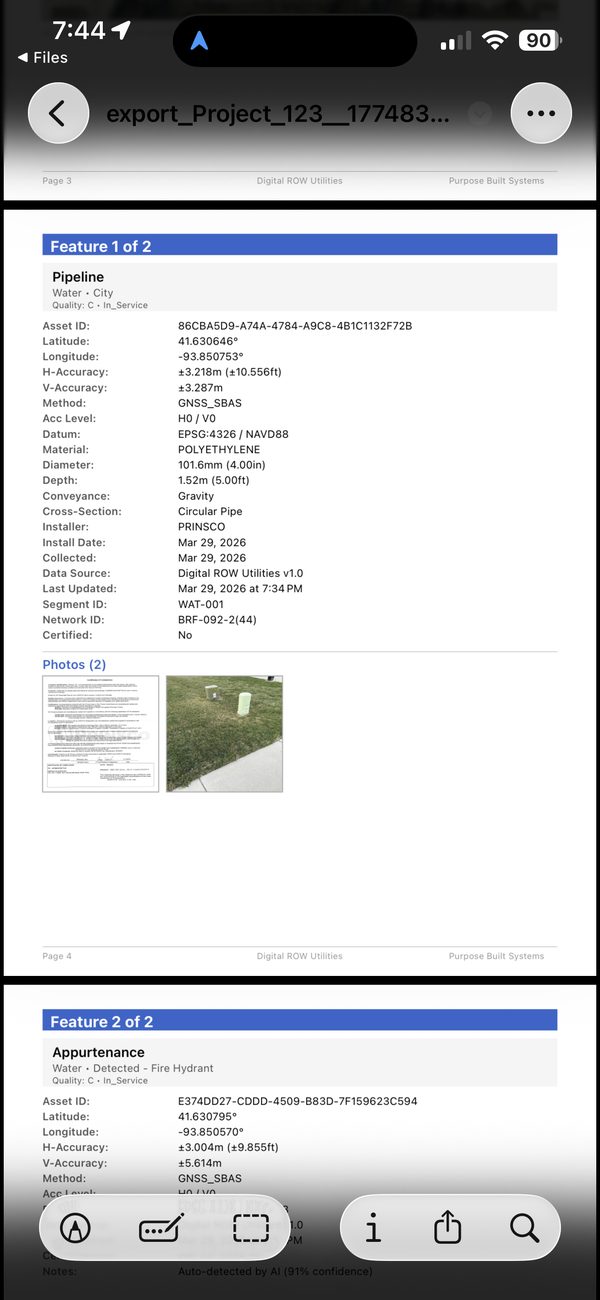
- Open Export Current Session or the session export action. Choose a format offered by the installed build that matches the recipient's needs: GeoJSON for GIS, CSV for a table, or PDF Report for a readable review. Share to an approved destination selected by your organization.
- Reopen the delivered file in the receiving workflow. Compare feature count, geometry, unit labels and photo references with the source session. Where available, retain a session bundle with supporting photos and certification state. Confirm storage or backup before deleting or clearing local records.
Try it on your training project
Export a training GeoJSON or CSV and a readable report when available. Ask a partner to verify the point and line and identify one unresolved item.
An export is not automatically a restorable backup. A CSV or PDF may not carry full geometry, photos or certification state. A share-sheet action also does not prove the recipient successfully received the file.
Complete the team handoff
Keep publishing, permit preparation and traffic-control linkage explicit and reviewable.
- Where GIS publishing is enabled in your build, use your organization's authorized destination. Review schema and field mapping and the queued changes before Sync now. If the app cannot confirm an upload, follow its review procedure instead of blindly repeating the submission.
- For permits, review the generated package, jurisdiction, attachments and the agency's current submission route. A prepared package is not an issued permit. Use direct submission only when the installed workflow and the receiving agency support it.
- If utility work belongs to a DTCD work zone, review the linked project or work-zone identifier. Hand off the training deliverable with its review status, source list, limitations and responsible reviewer. Keep practice records clearly labeled and separate from production submissions.
Try it on your training project
Give a two-minute handoff: project, assets, method, uncertainty, public sources, outstanding issues and next reviewer. Use a test destination for any supervised publishing practice.
Publishing and agency submission availability vary by app build, organization and receiving system. Training completion is an orientation record, not professional certification or authorization to perform regulated work.
Your field lab
Create DRU TRAINING - DO NOT SUBMIT, one fictional valve point and one three-vertex line in a safe practice area. Attach photos, correct one dimension, identify one source and export a file your partner can reopen.
Deliver these five things
- Correct project and work-area context.
- A saved point and line with owner, method and uncertainty.
- Photos and notes supporting the important values.
- A source note distinguishing utility assets from reference geometry.
- A reopened export, retained evidence and a named next reviewer.
The handbook includes printable trainer observations, a field checklist, troubleshooting, answer explanations and four actual iOS screenshot examples.
Open the training handbookCheck your understanding
Choose one answer per question, then review the explanations. This orientation does not confer professional certification.