From work area to
a plan your crew can check.
A practical manual for the website planner. Follow the road, keep landmarks visible, and hand off a location-aware draft for review.
Updated October 14, 2026 · For the deployed web workflow. Mobile availability depends on the installed app version.
1. Get ready
Sign in with the account linked to your qualifying paid dashboard plan, assigned App Seat or active production mobile Pro purchase. If you see the subscription screen, choose a qualifying plan or refresh access after restoring your purchase. An account alone does not unlock the editor.
Have the job location, work limits, occupied area, traffic direction, posted speed, lane count and width, duration, and road authority ready. Bring a surveyed alignment if available. Road data can help fill fields; verify its source and answer anything the planner cannot establish.
Name the job. The draft is kept locally in your browser; use Save on this browser for a named local copy and Editable backup for a portable backup. Browser storage is tied to that browser and device.
2. Mark the road
- Select My location and allow this site to use location. If unavailable, use Go to coordinates or pan and zoom to the job.
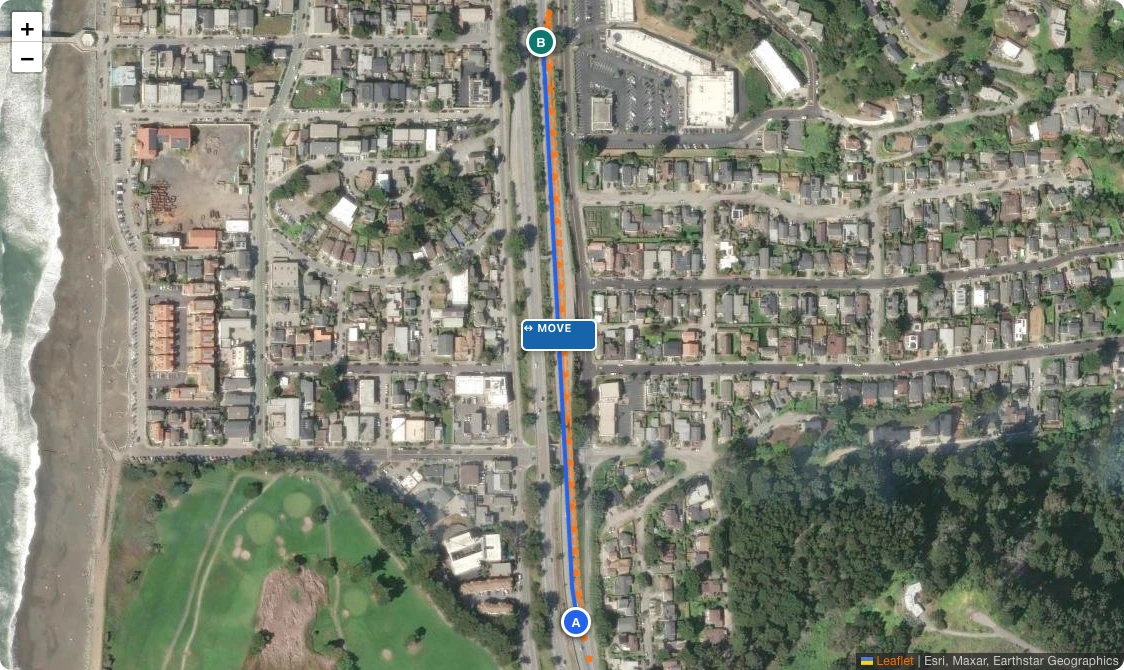
- Use Street to identify the correct road and Satellite to inspect physical context. Click A at the start of the work area, then B at its end, in the direction traffic travels.
- Check the matched road against curves, divided carriageways, ramps and landmarks. A nearby road match is not proof that it is the intended road.
- Select the intended right or left side. Choose Draw work footprint, click at least three corners around the occupied workers, equipment and materials, then Finish footprint. Confirm the lane reference and working clearance before accepting the suggested closure.
- Use Extend upstream road and Extend downstream road to cover the complete traffic-control layout. Click farther along the same road. Continue until every device has roadway geometry.
Use a survey or boundary file
Import survey alignment accepts supported road lines from CSV, DXF, LandXML, KML or GeoJSON. Import work area accepts KML/GeoJSON polygons or a closed 2D polyline in ASCII DXF. Choose the intended boundary or feature; road lines and work polygons serve different purposes.
Confirm the datum, projection and units supplied by the surveyor. DXF drawings must be georeferenced; a local assumed grid cannot be positioned automatically. Inspect the imported line or boundary against the site before continuing.
Move or clear the work
Drag MOVE to slide the layout along the available road. Drag an endpoint to resize the work area, a sign to adjust its planned position, or a footprint corner to correct the occupied area. Moving a layout can require more road geometry and another review.
Undo work-area point removes the last work limit. Clear work area resets the work selection; Clear detour resets the detour. Clear all points clears both selections. Use Clear footprint for the occupied polygon. Save a backup before resetting a job you want to keep.
3. Check the generated layout
The footprint can recommend the affected closure. Confirm the recommendation rather than assuming it fits the site. In Work setup and Work details, verify the closure, traffic direction, lane closed, duration, flaggers and intersection relationship. Available types include lane, shoulder, half-road, sidewalk, bike lane, ramp and crosswalk closures.
- Answer the remaining road questions, including speed, lanes, width and road context where missing. Check the selected jurisdiction, standard and typical application.
- Confirm the side and lane position. Lane numbering starts at the inner lane edge and increases toward the selected side; compare it with the actual carriageway.
- Inspect advance warning, taper, buffer, work space and termination. Distances are measured along the road, not as a straight A–B chord.
- Check each sign face and its displayed message against the device schedule and placement. Resolve distance-legend or withdrawn-sign warnings through the review controls.
- Inspect driveways, crossings, ramps, intersections and nearby work zones throughout the entire layout, including outside A–B.
4. Add the site details that matter
Use Draw site detail on satellite imagery to trace the available site features. Choose the feature type, click its points, and select Finish site detail. Use landmarks to make field identification easier. Check measurements and positions against survey or field evidence; imagery may be outdated or offset.
Ramps and intersections
Confirm which connections are affected and whether access remains open or closes. Verify traffic paths, turn movements, lane/gore geometry, clearances, approach signing and phase changes. Use the connection and site-detail controls to supply the required evidence and resolve the generated issues. A mainline closure line does not establish a safe ramp or intersection treatment.
Sidewalks and crossings
Trace the actual pedestrian route and affected features, including crossings and curb ramps. Confirm an accessible continuous route, working clearances, barriers and crossing locations. For sidewalk/crosswalk work, enter Distance back to the last crossing (ft) so upstream crossing guidance is tied to the intended crossing rather than leading pedestrians into the work.
Phases and unresolved details
Build and inspect each applicable work phase and its detail sheets. The planner can apply encoded checks and generate a starting layout; it cannot infer every field condition. Where an arrangement requests site design, provide the required dimensioned detail and reviewer decision. Do not treat an intent checkbox as a completed connection design.
5. Preview the actual sheets before export
- Open 3. Review & download. Resolve layout issues and confirm complete roadway coverage.
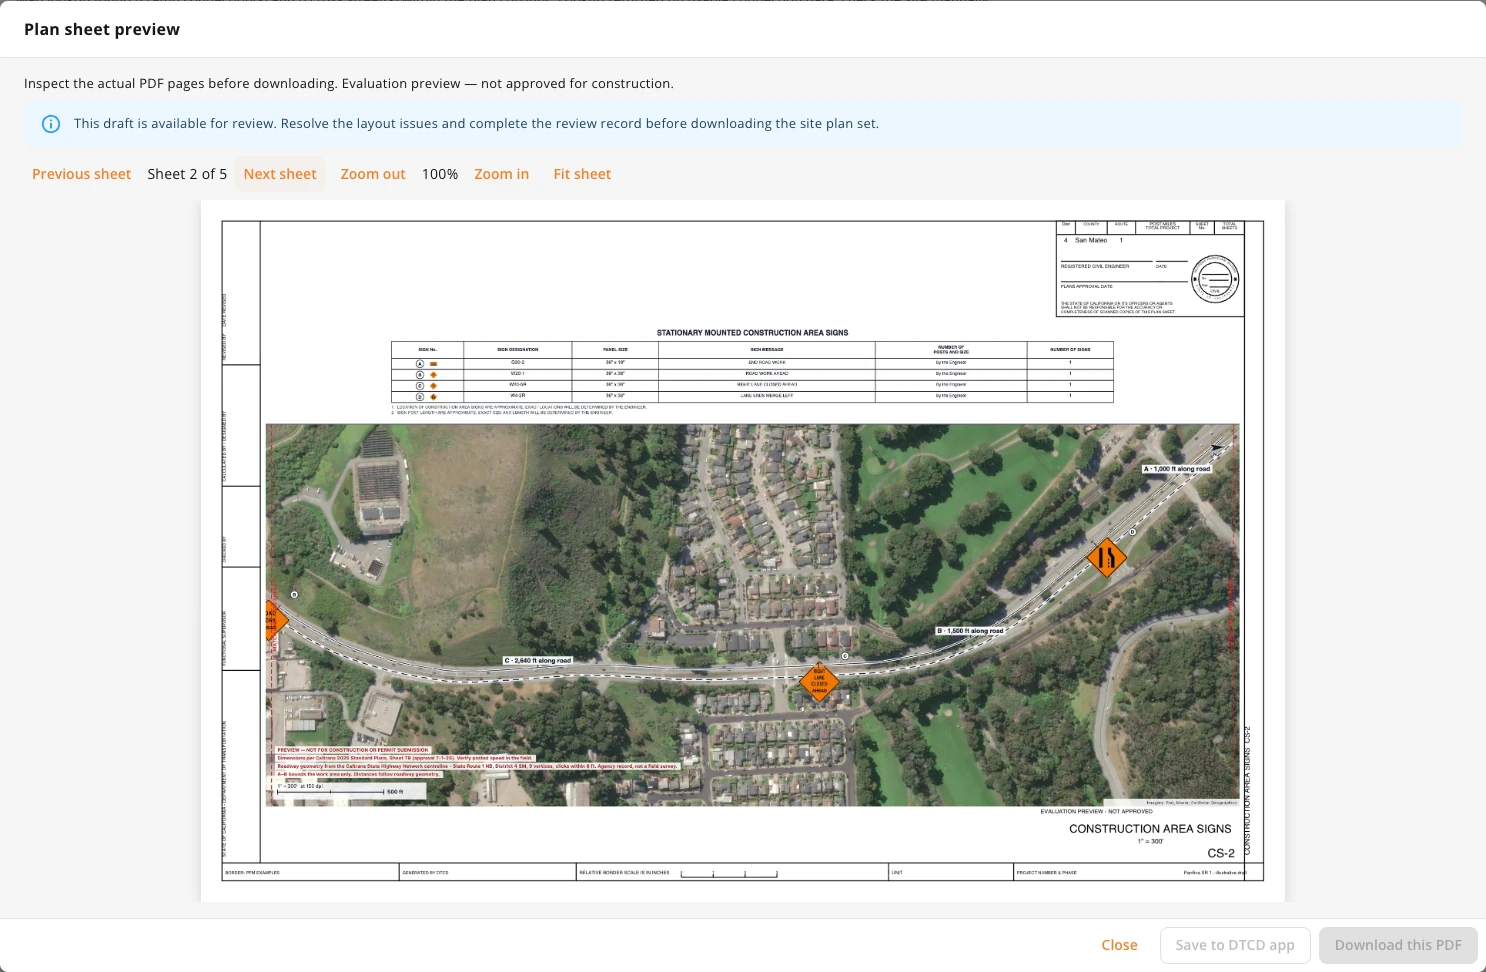
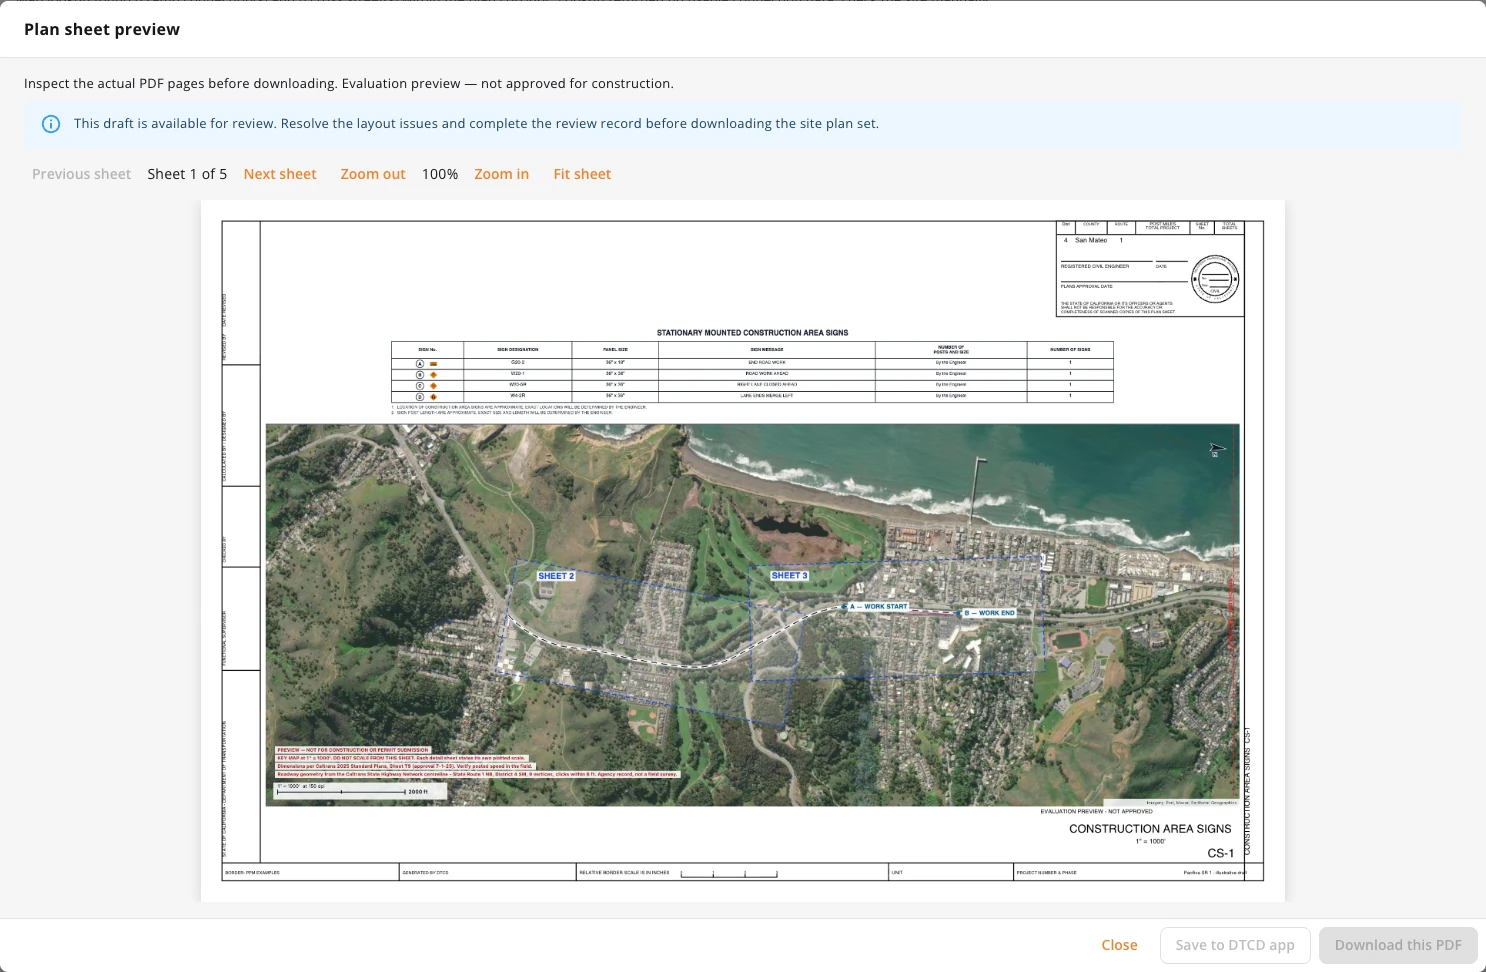
- Select Preview plan set. Inspect every page using Next sheet, zoom and Fit sheet. Map sheets should show satellite landmarks, the road-following layout, devices and dimensions; an overview may show the detail-sheet extents.
- Check readable scale, sign schedule, measurements, work limits, imagery, sheet boundaries and detail phases. If the site cannot be identified or anything is missing, correct the plan before downloading.
- Record the road authority, work phase, revision, responsible reviewer, agency seal requirement and its source. Complete the relevant review checks. Layout or input changes require a fresh review record.
- Download the plan set when eligible, or prepare the satellite-backed review package for your reviewer. Download availability does not mean agency approval.
Choose the correct output
| Output | Use it for |
|---|---|
| Map-backed plan set / -plan-set.pdf | The site-specific draft: satellite context, road geometry and geographic map sheets. Open this PDF first in the review ZIP. |
| Satellite-backed review package | The plan set plus supporting review data, schedules and editable material. Resolve the remaining draft issues with your reviewer. |
| Schematic-only PDF | A supporting straight diagram. It deliberately has no map and is not the geographic site plan. |
| Google Earth plan (KMZ) | Geographic sheet overlays in Earth. Use the companion KMZ; do not assume Earth will place a PDF automatically. |
| Aerial CAD ZIP | CAD handoff. Read its coordinate-system instructions: local-feet and geographic UTM drawings use different coordinate spaces. |
| Editable plan file / Quantities CSV | Portable editing backup / device quantities. Neither replaces the plan-sheet review. |
The geographic PDFs carry sheet placement and planned device metadata. Import support varies by application. Keep the original PDF bytes and verify the imported position before relying on it. If satellite loading fails, retry after restoring connectivity; the main plan-set export rejects missing imagery instead of silently substituting a blank background.
6. Share with your crew and verify in the field
- Use Preview & verify on dashboard map to inspect an eligible layout in map context.
- For direct publication, choose Save to DTCD app, select the accessible closure and the account-linked crew members who should receive it, then Save to closure. Resolve preview/review issues first.
- With no selected recipients, a new publication is private to its uploader. Recipients need an account-linked assignment on the closure. Removing that assignment revokes server access; downloaded/offline copies cannot be recalled.
- In a compatible app version, use the closure plan/PDF overlay workflow. Verify the sheet position against recognizable landmarks and field evidence. Supported clients can read PurposeBuilt sheet placement and planned device waypoints; other PDFs may need manual placement.
- Compare each planned sign and device with its installed location. Record actual observations through the app's field workflow. Planned coordinates are not proof of placement.
Saving grants access; it does not notify workers, approve the design, record installation or establish a professional seal. Check your installed mobile version: newer geographic handoff features require a compatible mobile release.
A short practice job
Choose a familiar road for an evaluation-only exercise. Mark a short work area, draw its footprint, extend both ends of the road, and preview the plan set. Complete the checks below before using the workflow for a real job. These practice boxes stay on this page and do not update your planner review record.
When something needs attention
The PDF is straight or has no satellite background
Check the filename and export button. Schematic-only outputs are intentionally straight and have no map. Use Preview plan set or the -plan-set.pdf inside the satellite-backed review package. If that file is missing or preparation fails, confirm complete geometry and successful imagery loading.
Signs or cones are missing, or the route leaves the road
Read the geometry warning. Extend the same road upstream/downstream, inspect the matched carriageway, or import a longer verified alignment. Use a surveyed source or manual correction where the lookup cannot resolve the road. Do not accept a straight fallback as actual roadway geometry.
My location does not work
Allow location for dashboard.purposebuilt.systems in the browser's site settings and check device location settings, then select My location again. Permission is specific to each domain. Go to coordinates or pan to the site when location is unavailable.
Download or Save to DTCD app is disabled
Check paid access, roadway coverage, unresolved layout/site-detail issues and the current review record. Confirm an eligible preview and closure access before publication. Resolve the displayed issue rather than substituting a schematic for the site plan.
An imported boundary appears in the wrong place
Verify feature selection, datum, projected coordinate definition and drawing units. Confirm the file is georeferenced. A wrong coordinate system or assumed local grid must be corrected with its author before geographic placement.
A colleague cannot see the plan
Confirm they are signed into the intended account, have an account-linked closure assignment, and were selected as a recipient. Refresh the closure plan library and check app compatibility. Sharing with a group does not send a notification automatically.
I have a subscription but still see the paywall
Use the same account as the purchase, restore/link the mobile purchase where applicable, and refresh access. Confirm the subscription is qualifying and current, or that the App Seat is assigned. Photo/AI-only and V2X-only add-ons do not unlock the planner.
For support, include the job revision, selected export, exact error and the step that failed. Avoid including credentials or payment details. Contact PurposeBuilt support →